
My Top Upholstery Tips for Beginners
If you’re just starting your upholstery journey, welcome!

There’s nothing more satisfying than transforming a worn-out piece of furniture into something fresh and beautiful. The best way to learn upholstery is simply to start—take a class, watch YouTube tutorials, read some books, and then dive into your first project.
To help you along the way, I’m sharing my top upholstery tips—the ones that will save you time, make your work easier, and help you achieve a more professional-looking result.
Let’s get started!
This post contains affiliate links which means I may make a small commission on purchases made through these links. For more information, please see my Disclosures here.
Use the Right Tools (Especially This One!)
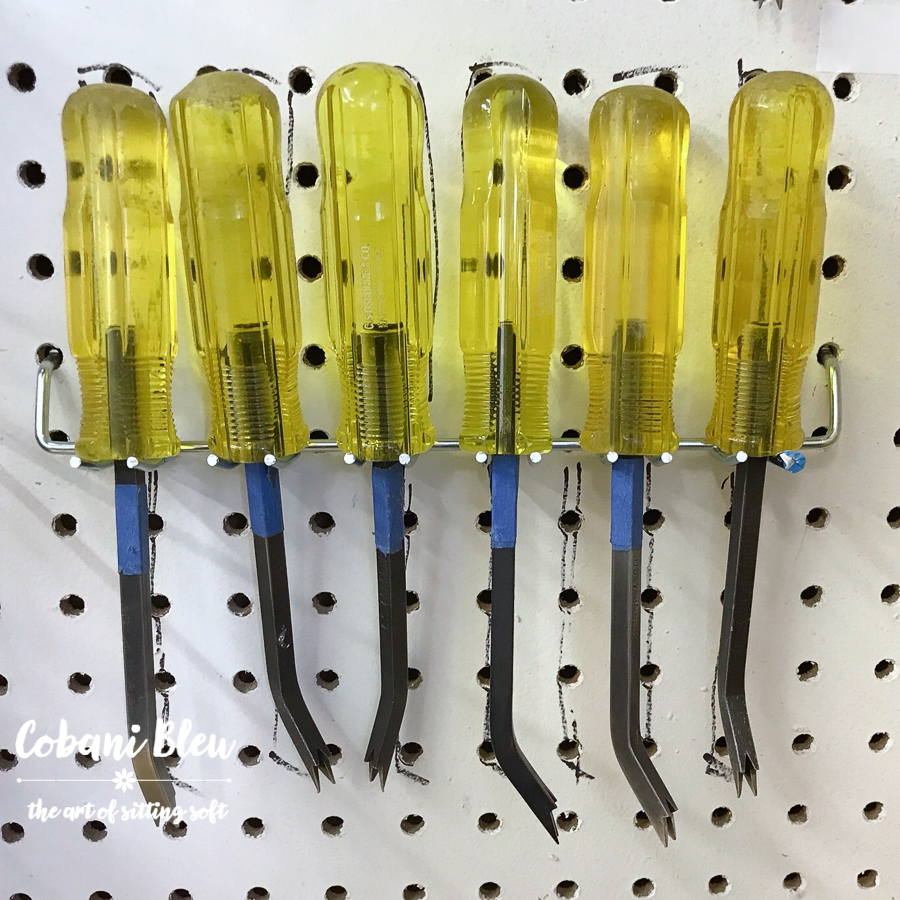
Having the right tools makes all the difference in upholstery. While there are many that can improve your workflow, one tool I absolutely recommend for beginners is a staple lifter.
Why a Staple Lifter is a Must-Have
One of the hardest (and most tedious) parts of upholstery is removing old fabric, staples, and tacks. A high-quality staple lifter, like the C.S. Osborne & Co. Stapler Lifter 120 1/2, makes prying out even the most stubborn staples much easier.
⚠️ Safety Tip: This tool is sharp! Always work with the points facing away from your hand to avoid injury (trust me, I’ve learned the hard way!).
💡 Avoid cheap, flimsy versions sold at craft stores. They won’t provide the leverage you need and will only lead to frustration.
You Don’t Have to Remove Every Last Staple
I know how tempting it is to get every single staple out, but here’s the truth:
✅ If a staple won’t create bumps under the new fabric, you can leave it.
✅ If a staple breaks while removing, just hammer it flat.
✅ Your main goal is a smooth surface, not a spotless frame underneath.

Know When (and When NOT) to Use Old Fabric as a Pattern
Many DIYers will tell you to use the old fabric as a pattern, but this isn’t always the best approach.
When You CAN use old fabric as a pattern


When You Should NOT Use Old Fabric as a Pattern:
❌ If the old fabric has stretched out over time
❌ If it’s not a sewn piece, you generally need extra fabric to pull and smooth
💡 Pro Tip: When in doubt, cut your new fabric larger. You can always trim it down, but you can’t add fabric back!
Smooth & Tighten Fabric the Right Way
One of the biggest beginner mistakes? Pulling fabric with your fingers. Instead, follow these tips for a smooth and professional finish:

Stapling Strategy: Center Out for a Wrinkle-Free Finish
This simple method will keep your fabric smooth and even:
1️⃣ Tack the fabric loosely on all sides to check alignment.
2️⃣ Start stapling at the front center and work outward to one side.
3️⃣ Leave space at the corners for folding and tucking neatly.
4️⃣ Repeat on the opposite side, smoothing as you go.
If you don’t follow this method, you’ll likely end up with wrinkles or fabric shifting out of place—meaning you’ll have to redo it!

Final Thoughts
There’s a lot to learn in upholstery, but these simple tips will set you up for success. Whether you’re working on your first chair or your tenth, following these guidelines will help your projects look polished and professional.
And seriously—if you only take one tip from this post, get the right staple lifter! You’ll thank me later.
Bonus Freebie now available: Sign up for The Freebie Library and get a downloadable guide to My Top Upholstery Tips for Beginners.
Available in the freebie Library- get access now!
Free Downloadable Guide to My Top Upholstery Tips for Beginners


Hey Nancy – we swear we thought that your #1 tip was going to be “Go to a professional” LOL. We have pretty much done everything with furniture and fabric…except upholstery. We have done simple bench or chair cushions, but we have never had the courage to actually tackle an upholstery project. We actually have a wing chair that we thought we would do our fabric paint treatment to. Maybe we should try some fabric this time. You are always so encouraging! Thanks for the valuable tips! Hugs…Jenn and Vicki
Hey Vicki and Jen! Thanks for stopping by! Love your tip – Go to a professional! Haha! Upholstery seems to be so intimidating. It’s really just some fabric and staples. I’m not sure I’d start with a wing chair but you should give it a try. You ladies are so smart and talented, I bet you would do great!
And I really appreciate the support from my two favorite Bees!!! Thanks Ladies
I’ve always wanted to try an upholstery project but I am intimidated for sure. Your tips are wonderful and making me feel like I could do this. Pinning!
Hey Patti, Upholstery really can be intimidating but it shouldn’t be. Find a simple chair or stool to start out. And you really learn a lot when you strip it! I’ve challenged my self to learn new techniques such be stripping the old fabric off! Let me know if you decide to try your hand at it! And thanks for stopping by!
I have always wanted to learn this! Good Tutorial.
Maria
Thanks for stopping by, Maria. I’m glad you found the post beneficial! You should find a simple project to start with and just go for it!!
Love these tips!
Hey Tracy,
So glad you found these tips useful! Thanks for stopping by!
Sit Soft,
Nancy
These tips are good Nancy. I love all your work -such talent!
Oh thanks so much Gayle! I truly appreciate your support and friendship!
Like what I read. Would like to learn more.
Hi Deanne, I’m so glad you enjoyed the post. I am planning to post more upholstery tips and resources in 2021. Be sure to sign up for my newletter, so you’ll know when a new post is up. Thanks much,
Nancy
Nancy,
Just read your best beginner tips and I am laughing at my first attempt! I just did a first time upholstery on a friends motor home window treatments! You are so right about the staple removing. We did not have the trusty remover you suggested but with much tenacity got the job done! We wore out two craft staplers and ended up with a heavy duty hand stapler that just about did my hands in! Broken blood vessel in my palm! Ouch!
So I came home and decided that I now had enough under my belt to tackle an ottoman that matches a wood armed chair that I know I am not ready to do! The ottoman took half a day to take apart. Still don’t have the trusty staple remover, but will be my first purchase! I am amazed at all the layered steps that are required to put this back together! There is webbing under and foam around the edges that should be replaced but I don’t know how the remove without just ripping off and then removing the staples. The eternal cushion is a very large fabric wrapped combination of some kind of fillers. My question is should I replace the foam edging, replace the webbing and how to clean the cushion filling cover? To go to all that work I just want it to be clean and sanitized.
Hi Dianna,
Wow! I’m so happy you are giving Upholstery a try. Ottoman are such a good beginner project. Can you send me a picture of the foam edging you are talking about?
Often with ottomans, I remove all the old stuff, add new webbing then add foam to the top and wrap with Dacron which is like batting. Then cover with my new fabric. Then everything is nice and new on the inside.
I’m happy to help you if you’d like some assistance. Feel free to email or text me pictures. 404-754-0774.
Thanks
Nancy
Hi Nancy, loved your tips. I am reupholstering a Queen Ann type chair and loveseat for my nefew and these things have hay or horse hair in them and springs that look like old bed springs. I have a question….is it possible to use webbing and foam instead of the springs in them?
Hey Janet, yes you can definitely replace the old traditional materials with webbing and foam. It’s pretty common to do so. Since this is for a settee, you’ll want to be sure to use a webbing stretcher to get the webbing super tight. This provides a really good strong foundation. I would use a good quality foam of medium firmness, this puts it in the 30-50 pound range. Let me know if you have any questions, I’d be happy to help, even do a FaceTime call if need be. Good luck and let me know how it turns out. Thanks, Nancy
I have tried multiple staplers both electric and just heavy duty and I never get them driven all the way into the wood. I always have to hammer them in and then they sometimes go crooked and I really don’t know what I am doing wrong. I hold my one hand over the stapler front to put extra weight but it still doesn’t go all the way in. Is there a perfect stapler like your stapler puller?
Hi Betty Sue, I know it must be frustrating to work so hard and not get the results you want! Honestly, the perfect stapler for upholstery is a pneumatic stapler. The hand and electric are just not made for upholstery. Although they may suffice at the beginning of your upholstery adventures but eventually you will want to consider a pneumatic gun. You will continue to have the problems you are speaking of with any of these manual or electric staplers.
Once you do, you will be amazed at how easy they work and will never want to go back. Of course, you need an air compressor to operate the gun. I think this is what prevents people from moving forward with pneumatic staplers. You can get a pretty inexpensive compressor from Lowe’s, Home Depot or Harbor Freight. Usually for $100 or less. What you need is one that can provide your gun around 90 PSI. If this makes no sense to you, just ask the sales people. And don’t forget your hose and a quick release coupler. I think most staplers use 3/8” hoses. These less expensive compressors are nois. If you stick with upholstery at some point you may want to treat yourself to a quiet air compressor. They run $200+ but are such a nice quality of life option.
Ok so what to look for in a gun. Except for one option, the guns I recommend are pretty reasonably priced and either I or friends have used them and approve of them.
I prefer a long nose as it gives you more flexibility to reach harder to reach places. However, my first gun was a short nose and I used it without problem for years. Upholstery staplers are generally know as 71 series fine wire staplers. Common staple width is 3/8” with 3/8” legs. But can come in other sizes as well.
Porter cable short nose
https://www.amazon.com/Porter-Cable-US58-22-Gauge-C-Crown-Upholstery/dp/B00004SBC3/ref=sr_1_6?crid=FZXTZAOXC2A0&dchild=1&keywords=porter+cable+pneumatic+staple+gun&qid=1619733983&sprefix=Porter+cable+pne%2Caps%2C641&sr=8-6
Meite long nose
https://www.amazon.com/meite-MT7116LN-Pneumatic-Upholstery-Industrial/dp/B0169H2X5C/ref=sr_1_5?crid=16CZK4YQS1CFW&dchild=1&keywords=meite+stapler+gun&qid=1619734114&sprefix=Meite%2Caps%2C188&sr=8-5
Bea long nose – BEA staplers are the Cadillac of staplers and the prices reflect that, but they are worth it. I have two, but bought them both used. eBay is a good source for used upholstery equipment and if you can find a used one, snap it up.
https://www.nailgundepot.com/bea-7116436ln-22-gauge-long-nose-upholstery-stapler-14-to-58-details.html
Sailrite long and short nose – Sailrite makes very good short and long nose staplers. This gun uses a different larger size staple. So if you go with this option, buy yourself a couple of boxes of staples to go with it. It’s not as easy to find these staples unless you go back to Sailrite. I have a Sailrite long nose and love it. Since the staples are bigger it perfect for foundation work, stapling vinyl or stapling thru thicker multiple layers of fabric and Dacron. They are also much easier to remove when you need to do that. I have a number of friends that now use this stapler exclusively.
https://www.sailrite.com/search?keywords=Staple%20guns
Answering your question has prompted me to write a blog post about staplers so stay tuned for that. But I wanted to get back to you before that. If you have questions, please reach out! Good luck and happy stapling!
Nancy
I decided finally to upgrade my hand stapler to power and told my tool guy that I wanted an electric stapler. He told me I didn’t. We went the rounds until he finally asked me why. I replied that the air compressor (we already have a good one; it’s my husband’s) always makes me startle and jump, which is not good with a stapler in my hand. My tool guy sold me a very long hose for my new pneumatic stapler. The air compressor stays in the garage, and the hose reaches to my sewing studio. The vintage twin headboards turned out beautifully, and that pneumatic stapler made all the difference!
Oh Tracy, A pneumatic stapler I’d definitely a game changer in upholstery. I’m so glad you went with that option and we’re able to find a solution to that noisy air compressor. Having it in a different room is a great solution. I totally understand how jarring that thing can be. I upgraded to a quiet air compressor and I love it. Happy stapling!
Do you have any tips for removing old nail head trim from a Victorian chair? I think the guy that hammered them in must have been Goliath! I have the great staple removing tool you mentioned above, but I am finding the prongs a little chunky to get under the old nail heads. Is there another tool you might recommend that would do the job better?
Hey Louise! I feel you with those nailheads! Sometimes they can be a bear to get out. I’m glad you’ve at least got the good staple lifter. I’m not sure I have any better ideas but here are a few things you can try. Of course if these nails are close to the decorative wood, be very careful. Work from the opposite side if possible. So you want to get something under an edge and begin to pry it up. If the prong of the stapler lifter isn’t working, try a really really flat screwdriver. Look for one that is very thin. You might even try a metal paint scrapper. You may need to tap it on the end of the handle to force it under the lip of the nailhead. You can also do this with the staple lifter. Once you get it pry up just a bit use the stapler lifter to pry it out the rest of the way. Another option to try, is to loosen the fabric from the opposite edge, even if you have to cut it. Lift the fabric up and pull it up and away from the nailhead and see it you can get under the nailhead under the fabric. Sometimes that works well to pry it from beneath the fabric. Hope this makes sense. Also know that older chairs are often built with hardwood. And the harder the wood, the harder it is to get both staples and nailhead out of.
Hope this helps. Feel free to message me back if you need to !
Thanks Nancy
Hi Nancy! Thanks for the great information included in this email! I am just starting to try my hand and revamping furniture and chairs. I watch your tutorial that Wendy Conklin, “Chair Whimsy” had on one of her workshops and I fell in love with your ottoman tutorial. I already have the tools but I should probably invest in the staple lifter you suggested. Mine doesn’t dig in if needed. I would like to learn more about your online upholstery courses. I am new to all of this so I will do some searching. Thanks for sharing your time and knowledge with all of us!!!
Right now, I am sitting softly, ? Renea Hughes
P.S. I loved the story you told about “Sit Soft”
I’m so glad you enjoy the tutorial on Wendy hosted. It was so much fun to do and it has inspired me to start my own online classes. I’m so grateful for your support. If you ever have questions I’m happy to help out if I can. That stapler lifter is worth the price ($24 or so) so I would definitely invest in one. I love that you have embraced the sit soft lifestyle! Yay!
Thanks
Nancy
Just found you thru Pinterest. Great tips! I’m off to bounce around your site.
Hey, Nancy. I’ve done several upholstery projects using rigid metal tack strips. On my latest (a bed footboard to match a headboard), when I hammered in the tack strip on the back it pulled a thread really tight in the fabric, making avery visible indentation along the top. I tried it again, and it pulled another thread the same way, so I gave up trying to re-position it. Is there anything I can do to loosen these threads so they don’t make an indentation? I’m afraid to cut them for fear of making something else look bad.
Thanks for any help you can provide.